Find the one bottleneck killing your revenue.
30-minute free strategy call with Charles. We diagnose your highest-leverage AI bottleneck, install Charlie OS live on your Mac or Windows in one hour, and map your exact next 30 days, all on the same call.
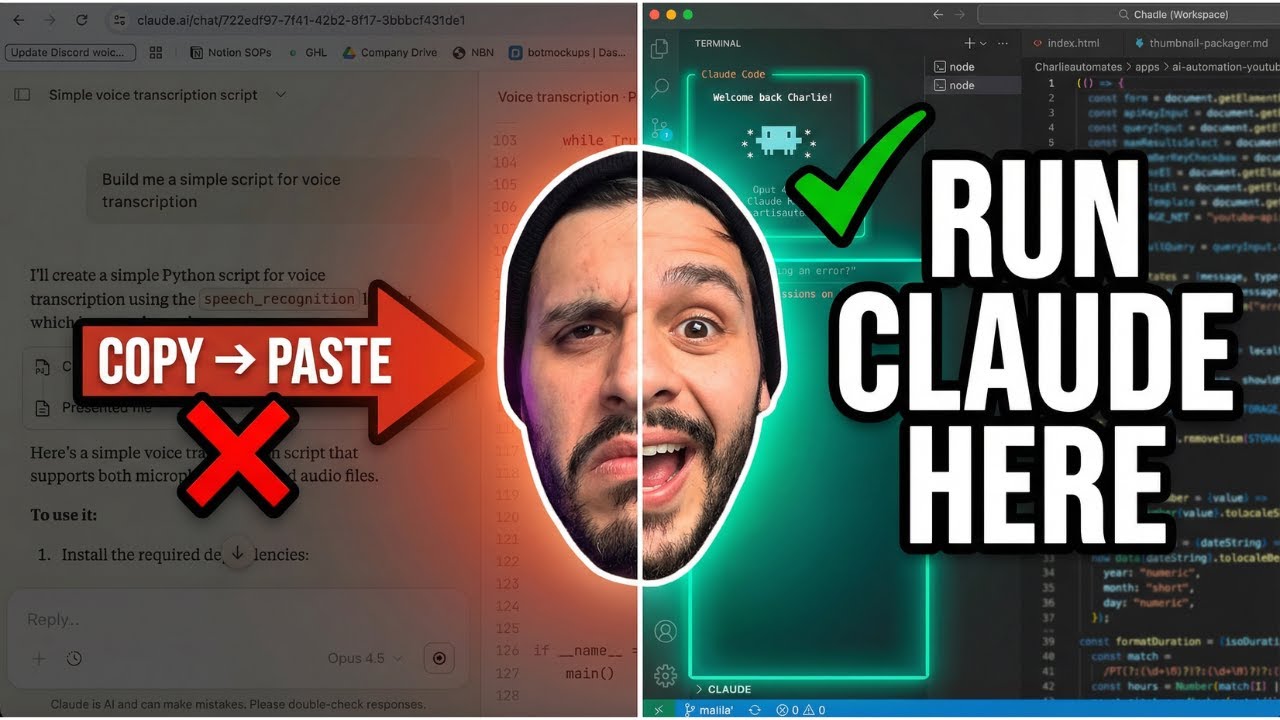
If you’re copying and pasting code from Claude into VS Code, you’re doing it wrong.
I’m not saying that to be harsh. I’m saying it because I watched dozens of people in my community do this exact thing. They’d chat with Claude in the browser, copy the code, paste it into their editor, hit an error, go back to Claude, paste the error, get new code, paste it back. Over and over.
That cycle kills your momentum. It kills your accuracy. And it’s completely unnecessary.
I’m Charles Dove, and on my YouTube channel @charlieautomates, I showed exactly how to fix this in under four minutes. This post breaks down the full setup so you can follow along at your own pace.
The Problem With Claude in the Browser
Here’s the thing most people miss. Claude in your browser is blind.
It can’t see your files. It doesn’t understand your project structure. It can’t fix errors accurately without you doing all the copying and pasting yourself. You become the middleman between Claude and your codebase.
Claude isn’t bad at coding. It’s bad at guessing your project. When Claude can’t see your files, it’s working with incomplete information. Every response is a guess based on whatever you pasted in.
That’s why people get stuck in the copy, paste, error, repeat cycle. They think Claude isn’t smart enough. The truth is Claude just doesn’t have enough context.
The fix is simple. Give Claude direct access to your files.
What You Need Before Starting
This setup takes about five minutes. You don’t need to be a developer. You don’t need terminal experience. You just need three things:
- VS Code downloaded on your computer
- A Claude account (free or paid)
- A folder on your desktop for Claude to work in
That’s it. No complicated dev tools. No package managers. No Docker containers. Just VS Code and a folder.
Step 1: Download VS Code
If you don’t already have VS Code, go to code.visualstudio.com and download it for your computer type. Mac, Windows, or Linux. It’s free.
VS Code is a code editor. Think of it like Google Docs, but for code. It’s where your files live and where Claude will do its work.
Step 2: Create Your Workspace Folder
Open up your file explorer. Create a new folder on your desktop. Call it whatever you want. I call mine “Charlie Automates” because that’s my brand.
Inside that folder, create a subfolder called “apps.” This is where you’ll build your projects.
Claude needs a place to work. This folder is that place. Everything Claude does will live inside of it. When you first open it, it’s going to look blank. That’s normal.
Here’s why this matters. When Claude has a workspace folder, it can read every file in your project. It can see your folder structure. It knows what files exist and how they connect. No more guessing.
Step 3: Open the Folder in VS Code
Open VS Code. Click on the explorer panel (the file icon on the left sidebar). Click “Open Folder.” Navigate to the folder you just created and click “Open.”
VS Code might ask you to trust the authors of the files in this folder. Click yes.
Then go to File > Save Workspace As. Save the workspace file right in your main folder. Name it whatever you want. This workspace file tells VS Code to always open this folder the same way.
Step 4: Set Up Your VS Code Layout
Before we install anything, let’s clean up the layout. This makes everything easier to see when Claude is running.
Go to View > Appearance. Here’s what I change:
- Panel position: Set it to left
- Primary sidebar: Turn it on
- Mini map: Turn it off (it’s just visual noise)
- Secondary sidebar: Leave it on if you want
These are small tweaks. But they make a big difference when you’re working with Claude in the terminal on one side and your files on the other.
Step 5: Install the Claude Code Extension
Now for the important part. Go to View > Extensions. Search for “Claude Code” and install the extension for VS Code.
That’s the only extension you need to get started. We’re not downloading a bunch of random stuff. Just the one thing that gives Claude access to your workspace.
If you’re using Codex instead of Claude, there’s a different extension for that. But in this walkthrough, we’re using Claude directly through the terminal.
Step 6: Open the Terminal and Launch Claude
Go to Terminal > New Terminal. A terminal panel will open at the bottom (or side, depending on your layout).
Type claude and hit enter.
If this is your first time, you’ll need to sign in with your Claude account. Follow the prompts. It takes about 30 seconds.
Once you’re in, Claude is alive. It’s running live inside of VS Code. It can see your files. It can read your project. It can write code directly to your folders.
If the terminal looks boring, that’s good. It means it’s set up correctly.
What Changes When Claude Has File Access
This is where it gets real. Now that Claude has a workspace and file access, it can actually do real work.
Here’s what’s different compared to the browser:
Claude can read your entire project. It doesn’t need you to paste code snippets. It can look at any file in your workspace on its own.
Claude can write files directly. No more copying and pasting. When Claude generates code, it writes it straight to your project folder.
Claude can fix errors in context. When something breaks, Claude can see the actual error, look at the actual file, and fix the actual problem. No guessing.
Claude can understand your project structure. It knows which files depend on which. It can navigate your codebase like a developer would.
This is the difference between having a contractor who’s never seen your house and one who’s standing inside it. The one inside it does better work.
Bonus: The Live Preview Extension
There’s one more thing that makes this setup really powerful. It’s called Live Preview.
Live Preview is a VS Code extension that lets you see your apps running inside the editor. You start the Live Preview server and it opens a browser window right inside VS Code.
So now you’ve got Claude building on the left, your code in the middle, and a live preview of your app on the right. It’s basically like using Lovable or Bolt, except Claude is writing the code directly on your machine.
The difference? You own everything. The files are on your computer. You can push them to GitHub. You can deploy them anywhere. No vendor lock-in.
I have a file that downloads all the extensions I use, including Live Preview. It’s available in the CC Strategic AI Skool community. Join and I’ll send it over.
Why This Setup Matters for Beginners
If you’re new to AI coding, this is the setup you want. Here’s why.
Most people start with Claude in the browser. They chat back and forth. They copy and paste. They build one file at a time. And it works… until it doesn’t.
The moment your project has more than one file, the browser falls apart. You can’t paste an entire project into a chat window. You can’t give Claude context about how files connect.
With this VS Code setup, you skip all of that. Claude sees everything from day one. Your projects scale without the pain.
Common Mistakes to Avoid
Don’t skip the workspace file. Saving your workspace in VS Code means your layout, extensions, and folder structure stay consistent every time you open it.
Don’t install a bunch of random extensions. Start with Claude Code and Live Preview. That’s it. You can add more later when you actually need them.
Don’t use the browser version for real projects. The browser is fine for quick questions. But if you’re building something, use VS Code. Every time.
Don’t build without a folder structure. Create your main folder. Put an “apps” subfolder inside it. Keep your projects organized from the start. Future you will be grateful.
What’s Next After Setup
This post covered the setup. That’s it. We didn’t build anything yet. And that’s intentional.
Getting the setup right is step one. If you skip this step, everything else gets harder. But once this is locked in, you’re ready to build real apps with Claude.
In future posts and videos on Charlie Automates, we’ll use this exact setup to build real projects. Websites, dashboards, automation tools, and more.
If you want to get a head start, join CC Strategic AI on Skool. That’s where I share templates, extension packs, and walk through builds live with the community.
Ready to Go Deeper?
FAQ
Do I need a paid Claude account to use Claude Code in VS Code?
You need a Claude account, but you can start with the free tier. The paid plan gives you more usage and faster responses. For serious building, I’d recommend the Pro plan.
Is VS Code free?
Yes. VS Code is completely free. It’s made by Microsoft and it’s the most popular code editor in the world. Download it at code.visualstudio.com.
Can I use Cursor instead of VS Code?
You can. Cursor is built on top of VS Code and has its own AI features. But for this tutorial, we’re using standard VS Code with the Claude Code extension. It’s simpler and you’re not paying for another subscription.
Do I need to know how to code?
No. That’s the whole point. Claude writes the code for you. You just tell it what you want in plain English. The VS Code setup just gives Claude a place to write that code.
What’s the difference between Claude in the browser and Claude in VS Code?
Claude in the browser is like texting a contractor photos of your house and asking for advice. Claude in VS Code is like having that contractor walk through your house, see everything, and fix things on the spot. It has full context and can do real work.
What extensions should I install?
Start with just two: Claude Code and Live Preview. The Claude Code extension connects Claude to your terminal. Live Preview lets you see your apps running inside VS Code. I share my full extension list in the CC Strategic AI Skool community.
Can I use this setup on Windows?
Yes. VS Code and Claude Code work on Mac, Windows, and Linux. The setup process is the same on all platforms.
What if I already have projects in other folders?
You can open any folder in VS Code and run Claude from the terminal. The workspace folder I described is just a clean starting point. Claude works wherever you point it.
How is this different from Lovable or Bolt?
Lovable and Bolt are browser-based tools that host your code on their servers. With VS Code and Claude, your code lives on your computer. You own it completely. You can deploy it anywhere. No vendor lock-in, no monthly hosting fees for the editor itself.
What’s the Charlie Automates Skool community?
It’s the community I run at CC Strategic where we teach Claude Code, AI automation, and building systems for business. I share extension packs, templates, and do live builds there. Join CC Strategic AI on Skool to get started.
Ready to install Charlie OS?
Stop reading. Start shipping.
The AI Bottleneck Protocol is a 30-minute free call. We pinpoint the one task eating the most hours and the most money in your business right now. We install Charlie OS live on your machine in under an hour. We map your exact path to fix the bottleneck on the same call. If we’re not a fit, you walk away with a clear diagnosis of where your business is leaking time and money. Either way, you win.